Many times I have been tempted to install an IRC bouncer. I use it often to keep in touch with maintainers and other folks online. Often, I got discouraged because I did not want to configure an additional piece of software. Only last week, I decided to give it a try.
Problem Statement
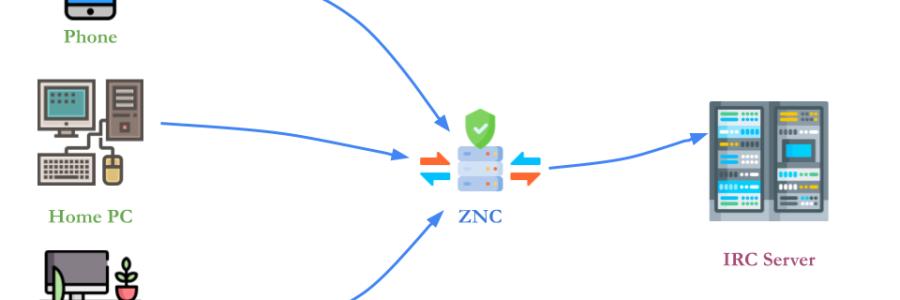
I hop-on hop-off from IRC from 3 different machines. I often lost messages and ideas were lost like tears in the rain. Of course this is a problem that has been around for a long time and has plenty of solutions. What I wanted was a way to get the messages exchanged (especially addressed to me) while I was offline.
Plus, I would like to be notified of the messages I receive while a client is offline. Unless those messages have been already delivered to another client (basically, avoid being spammed when a client comes up.)
To me, the ZNC bouncer seemed like the best way to go. So here you will find how easy it was to set it up.
Table of Contents
- ZNC Configuration
- Network exposure and DDNS
- HTTPS and Let's encrypt
- HTTPS and Let's encrypt
- Configure ZNC for multiple clients tracking
ZNC Configuration
Nowadays, anything is dockerized. I run docker on my server machine. So I went for the fastest solution. Run the docker image of ZNC. The DockerHub page is quite detailed. Check it out.
It is super easy to set it up. We need to run the command znc --makeconf. So, we just need to attach a volume to store the configuration.
What you need to keep in mind, are the following things:
- port (on which ZNC will listen for connections)
- Using SSL
- Credentials (Used both for the web interface and for connection)
Here a glimpse of configuration output:
docker run -it -v /archive/znc-conf:/znc-data znc --makeconf docker run -it -v /archive/znc-conf:/znc-data znc --makeconf
[ .. ] Checking for list of available modules...
[ ** ]
[ ** ] -- Global settings --
[ ** ]
[ ?? ] Listen on port (1025 to 65534): 26697
[ ?? ] Listen using SSL (yes/no) [no]: yes
[ ?? ] Listen using both IPv4 and IPv6 (yes/no) [yes]:
[ .. ] Verifying the listener...
[ ** ] Unable to locate pem file: [/znc-data/znc.pem], creating it
[ .. ] Writing Pem file [/znc-data/znc.pem]...
[ ** ] Enabled global modules [corecaps, webadmin]
[ ** ]
[ ** ] -- Admin user settings --
[ ** ]
[ ?? ] Username (alphanumeric): raffaele
[ ?? ] Enter password:
[ ?? ] Confirm password:
[ ?? ] Nick [raffaele]: rafspiny
[ ?? ] Alternate nick [rafspiny_]: raffaele
[ ?? ] Ident [raffaele]:
[ ?? ] Real name (optional):
[ ?? ] Bind host (optional):
[ ** ] Enabled user modules [chansaver, controlpanel]
[ ** ]
[ ?? ] Set up a network? (yes/no) [yes]: yes
[ ** ]
[ ** ] -- Network settings --
[ ** ]
[ ?? ] Name [libera]:
[ ?? ] Server host [irc.libera.chat]:
[ ?? ] Server uses SSL? (yes/no) [yes]:
[ ?? ] Server port (1 to 65535) [6697]:
[ ?? ] Server password (probably empty):
[ ?? ] Initial channels: e,gentoo,plex
[ ** ] Enabled network modules [simple_away]
[ ** ]
[ .. ] Writing config [/znc-data/configs/znc.conf]...
[ ** ]
[ ** ] To connect to this ZNC you need to connect to it as your IRC server
[ ** ] using the port that you supplied. You have to supply your login info
[ ** ] as the IRC server password like this: user/network:pass.
[ ** ]
[ ** ] Try something like this in your IRC client...
[ ** ] /server <znc_server_ip> +26697 raffaele:<pass>
[ ** ]
[ ** ] To manage settings, users and networks, point your web browser to
[ ** ] https://<znc_server_ip>:26697/
[ ** ]
[ ?? ] Launch ZNC now? (yes/no) [yes]: Yes^H^H^H
[ ?? ] Launch ZNC now? (yes/no) [yes]: yes
[ .. ] Opening config [/znc-data/configs/znc.conf]...
[ .. ] Loading global module [corecaps]...
[ .. ] Loading global module [webadmin]...
[ .. ] Binding to port [+26697]...
[ ** ] Loading user [raffaele]
[ ** ] Loading network [libera]
[ .. ] Loading network module [simple_away]...
[ >> ] [/opt/znc/lib/znc/simple_away.so]
[ .. ] Adding 1 servers...
[ .. ] Loading user module [chansaver]...
[ .. ] Loading user module [controlpanel]...
[ ** ] Running in foreground [pid: 10]
[ ** ] ZNC 1.9.0 - https://znc.inChecking the installation
If everything went fine, you should be able to access the interface at the URL https://docker run -p <port>:<port> -v <your-znc-config-path>:/znc-data znc
DDNS
Sadly, my current hosting company does not provide an easy way to programmatically change the DNS records. So I decided to go for DuckDNS.
Luckily, my Internet provider has a straightforward integration with them. I did not have to do anything particular. Just enable DDNs in my modem configuration page with the right parameter.
In this system and in many others, they ask for a username, but they need the token.

Certificates
Of course I wanted HTTPS! So I went straight for let's encrypt. You can use certbot manually, or rely on this wonderful docker image. It guides you into creating a certificate for your duckdns.org domain and validate it. You only need to specify a bunch of fields:
- DUCKDNS_TOKEN -> This has to be the token for your duckdns account
- LETSENCRYPT_DOMAIN -> This has to be the domain for which you are gonna generate the certificate
- LETSENCRYPT_EMAIL -> In case you want to be notified of renewal, it is better to specify an email where you can receive notifications
Note: For LETSENCRYPT_DOMAIN, *.subdomain.duckdns.org does not include subdomain.duckdns.org I put my variables in a env.list file and proceeded. Make sure the folder you use for the volume exists.
Example:
docker run --env-file /archive/letencrypt.env.list -v /archive/certificates:/etc/letsencrypt maksimstojkovic/letsencrypt
INFO: LETSENCRYPT_DOMAIN is unset, using DUCKDNS_DOMAIN
INFO: A wildcard SSL certificate will be created
INFO: LETSENCRYPT_CHAIN is unset, using default chain
INFO: No GID specified, using root GID of 0
DUCKDNS_TOKEN: xxxxxxxxxxxxxxxxxxxxxxxxxxxxxx
DUCKDNS_DOMAIN: xxxxxx.duckdns.org
LETSENCRYPT_DOMAIN: xxxxxxx.duckdns.org
LETSENCRYPT_EMAIL: xxxxxx@xxxx.xxx
LETSENCRYPT_WILDCARD: false
LETSENCRYPT_CHAIN: default
TESTING:
UID: 0
GID: 0
certbot certonly --manual --preferred-challenges dns   --manual-auth-hook /scripts/auth.sh   --manual-cleanup-hook /scripts/cleanup.sh    -m xxxxxx@xxxxx.xxx --no-eff-email -d xxxxxx.duckdns.org   --agree-tos --manual-public-ip-logging-ok --keep
Saving debug log to /var/log/letsencrypt/letsencrypt.log
Account registered.
Requesting a certificate for xxxxxx.duckdns.org

Successfully received certificate.
Certificate is saved at: /etc/letsencrypt/live/xxxxx.duckdns.org/fullchain.pem
Key is saved at:         /etc/letsencrypt/live/xxxxxx.duckdns.org/privkey.pem
This certificate expires on 2024-06-26.
These files will be updated when the certificate renews.
NEXT STEPS:
- The certificate will need to be renewed before it expires. Certbot can automatically renew the certificate in the background, but you may need to take steps to enable that functionality. See https://certbot.org/renewal-setup for instructions.

- - - - - - - - - - - - - - - - - - - - - - - - - - - - - - - - - - - - - - - -
If you like Certbot, please consider supporting our work by:
 * Donating to ISRG / Let's Encrypt:   https://letsencrypt.org/donate
 * Donating to EFF:                    https://eff.org/donate-le
- - - - - - - - - - - - - - - - - - - - - - - - - - - - - - - - - - - - - - - -
Sleeping for 6 hour(s) and 14 minute(s)
INFO: Attempting SSL certificate renewal
Saving debug log to /var/log/letsencrypt/letsencrypt.log

- - - - - - - - - - - - - - - - - - - - - - - - - - - - - - - - - - - - - - - -
Processing /etc/letsencrypt/renewal/xxxxxx.duckdns.org.conf
- - - - - - - - - - - - - - - - - - - - - - - - - - - - - - - - - - - - - - - -
Certificate not yet due for renewal

- - - - - - - - - - - - - - - - - - - - - - - - - - - - - - - - - - - - - - - -
The following certificates are not due for renewal yet:
  /etc/letsencrypt/live/xxxxxxx.duckdns.org/fullchain.pem expires on 2024-06-26 (skipped)
No renewals were attempted.
- - - - - - - - - - - - - - - - - - - - - - - - - - - - - - - - - - - - - - - -
Sleeping for 3 hour(s) and 8 minute(s)
INFO: Attempting SSL certificate renewal
Saving debug log to /var/log/letsencrypt/letsencrypt.log

- - - - - - - - - - - - - - - - - - - - - - - - - - - - - - - - - - - - - - - -
Processing /etc/letsencrypt/renewal/xxxxxxx.duckdns.org.conf
- - - - - - - - - - - - - - - - - - - - - - - - - - - - - - - - - - - - - - - -
Certificate not yet due for renewal

- - - - - - - - - - - - - - - - - - - - - - - - - - - - - - - - - - - - - - - -
The following certificates are not due for renewal yet:
  /etc/letsencrypt/live/xxxxxx.duckdns.org/fullchain.pem expires on 2024-06-26 (skipped)
No renewals were attempted.
- - - - - - - - - - - - - - - - - - - - - - - - - - - - - - - - - - - - - - - -
Sleeping for 11 hour(s) and 59 minute(s)
Use the right pem file
ZNC default configuration only look at the znc.pem file. In order to use the certificate generated by Let's encrypt, we need to follow the instructions to generate this file correctly.
cat /etc/letsencrypt/live/subdomain.duckdns.org/{privkey,fullchain}.pem > znc.pemDo not forget to do this periodically. If you use the docker image I use, the certificate will be renewed automatically, but you have to cat the pem files every time. More resources at the official ZNC wiki page
Connect to the bouncer
To quickly check if it was ok, I run HexChat against my bouncer. To know what to do, please refer to the manual of your client. For HexChat, a very useful resource is here
Overall, you need to know few things.
NOTE: username and password are related to the account on the ZNC bouncer, not your IRC credentials.
The username is in the format
<zncusername>/<network_name><zncusername>@[client_identifier]/<network_name>
Basically, the client_identifier is optional. I will talk a bit more about this later.
Please Note: both zncusername and password are the one of the znc user, not the one to identify yourself with the upstream IRC network.
Configure ZNC for multiple clients tracking
The reason behind being able to track clients is that I connect from multiple places (office, work, other laptop) and I end up forgetting what it has been said in a conversation. I wish to be able to see (or even better, to be notified of) the conversation I was involved on client A and kept going after I disconnected, when I log in on client B. Basically, I really wanted to use the ClientBuffer module of ZNC.
Keep in mind that ZNC has different kind of modules. They also have a special section for the possible solutions for the problem we are trying to solve here: Multiple clients.
One of the reason why I loved the docker image of ZNC is that is automatically checks for new modules and compile them on the fly when it starts. What I had to do was simply get the source (in ClientBuffer case a .cpp) file in the datadir of znc.
Install the module
The original ClientBuffer module is not maintained anymore, but a fork of it is the recommended one.
Inside the container (docker exec -it <container_name> /bin/sh)
wget -O /znc-data/modules/https://raw.githubusercontent.com/CyberShadow/znc-clientbuffer/master/clientbuffer.cppand then restart the container. For instance docker restart <container_name>.
Configure the module
Following the guide from ZNC wiki page, please disable AutoClearChanBuffer and AutoClearQueryBuffer as in the picture. The settings are in the Your settings section.

And enable the module in your network tab.

The autoadd options makes sures that each client is gonna be added to the list of clients to keep track of.
Configure the clients
As reported before, you need to use <zncusername>@[client_identifier]/<network_name> otherwise your client won't be tracked by ZNC and you won't get messages next time you connect with the same client.
That's all. That's how my HexChat configuration looks like.

Recognition and references
Icons for the header picture: Pc icons created by Stockio - Flaticon